Order Processing
Manual Order Sync
Manually sync individual Shopify orders to QuickBooks Online
Manual Order Sync lets you sync individual orders one at a time from the Orders page. This is useful when you want to selectively sync specific orders rather than syncing everything automatically.
How to Manually Sync an Order
- Navigate to the Orders page in the QuickBooks Connector app
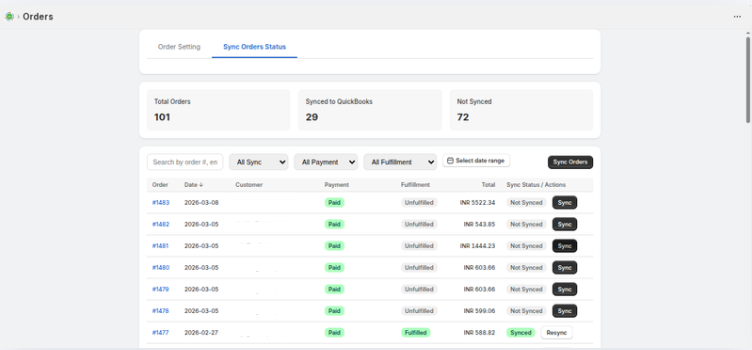
- Click the Sync Orders Status tab
- Browse or search for the order you want to sync
- Click the Sync button next to the order
Order List
The Sync Orders Status tab displays a table with the following columns:
| Column | Description |
|---|---|
| Order | The Shopify order number (clickable link) |
| Date | Date the order was created |
| Customer | Customer name associated with the order |
| Payment | Payment status (Paid, Unpaid, etc.) |
| Fulfillment | Fulfillment status (Fulfilled, Unfulfilled) |
| Total | Order total amount with currency |
| Sync Status / Actions | Sync status with Sync or Resync button |
Searching and Filtering
Search
Use the search bar to find orders by:
- Order number
- Customer name
- Customer email
Filters
- All Sync — Show All, Synced only, or Not Synced only
- All Payment — Filter by payment status (Paid, Unpaid, etc.)
- All Fulfillment — Filter by fulfillment status (Fulfilled, Unfulfilled, etc.)
- Select date range — Filter orders by date range
Resync an Order
If an order has already been synced but you need to update it in QuickBooks:
- Find the order on the Sync Orders Status tab
- Click the Resync button (shown for already synced orders)
- The order will be re-queued with the latest data from Shopify
Resyncing an order updates the existing QuickBooks record rather than creating a duplicate entry.